Search greenbayroute.com:
Green Bay & Western Lines
The East-West Short Route
 [Home]     Information ] Locos ] Rolling Stock ] Photos & Stuff ] Ephemera ] Modeling ] References ] Site Map ]
KGB 7109

Up ]


A Kewaunee, Green Bay & Western 7100- class gondola as it looked during the 1950s and 1960s.


KGB Gondola from MDC kit (HO)

The inspiration for this model came from the new Scale Rail Graphics GBW/KGB 40' wood boxcar decal set, and a similar model done by Andy Laurent.


KGB 7109 started with an HO scale MDC gondola

Larger Image

The Prototype

The prototype 40-foot gondolas are ex-Norfolk & Western 90000-cars, built 1909-1913. The Kewaunee, Green Bay & Western acquired the cars in January 1936 and some of these cars remained on the KGB roster until 1964. The most notable spotting feature was the ten panels on each side of the 40' long steel car.

Andy Laurent pointed out that modeling this car was on his to-do list and he thought that a Model Die Casting gondola made a good starting point. We had a little back-and-forth discussion about specific details, lettering, and herald colors, we were soon off to our workbenches!

Quick links:

KGB 7101-7199 roster information

Basic Car Body

We started with the HO scale Model Die Casting (MDC) 40' Steel Gondola. Make sure to get one of the flat end (not oval end) models. The end panels are slightly larger than the interior panels on the KGB cars, while the MDC model has equal-spaced panels; and the prototype's outside dimensions are 39'-11" x 9'-9" and the top of the gondola is 8'-2" above the rail, compared to the models dimensions of 40'-9" x 9'-4" x 9'-2". So this model is not exact, but close enough. And "close enough" became my mantra for this project.

An undecorated car would be ideal, but many of these gondola kits are black with minimal white lettering and if you can't get an undecorated car it takes little effort to remove the lettering.. My particular car came pre-lettered for "Maintenance of Way," so I started by soaking the plastic car body in 70% isopropyl alcohol for about a day. A little scrubbing with a toothbrush took off the lettering.

Modifications

The ribs on the kit extend below the bottom of the gondola -- a characteristic of the Chesapeake and Ohio prototype that the model is based on. I used a sprue cutter to remove the extensions at each rib and also the stirrups at each corner and then used a large file to smooth the bottom of the car body.

Next, I used a knife with an X-Acto #17 chisel blade to remove the cast-on grab iron detail on the sides and ends of the car body. There are four steps on the right and two on the left of each side plus two on each end - a total of sixteen grab irons to be removed. The areas were wet-sanded with a little K&S Flex-I-Grit #320 sandpaper to smooth them.

Quick links:

X-ACTO
   No. 17 Chiseling Blade

K&S Engineering
   Flex-I-Grit

Details

I replaced the grabs and steps with Tichy Train Group #3021 grab irons and A-Line #29001 stirrup steps (style B). I didn't take specific notes of what size holes I drilled with my pin vise for these parts; I used a dial caliper [I just got a cheap one on eBay last year, I've found it to be a very handy tool for situations like this] to measure the wire size and then used one drill bit size larger for the holes. The grabs and steps were secured with Zap cyanoacrylate adhesive (CA). I had used Jet CA prior to this project; I found the Zap adhesive much easier to use.

The underframe of the MDC kit is a metal casting. I used my Dremel motor tool to grind down the noticeable casting sprues, but didn't add any additional underbody detail. If someone wanted to take this project to the next level, adding underbody detail would probably give the most bang for the buck.

Quick links:

Tichy Train Group
   
#3021 grab irons

A-Line/Proto Power West
   #29001 stirrup steps (style B)

eBay
   Dial Calipers

Zap Glue

Dremel

Painting & Decals

I glued the underbody to the plastic body with Zap CA and added the brake wheel to the end of the car body. The basic car was ready for the paint shop. I gave it a coat of Modelflex #16-05 Weathered Black and then some Gloss #16-603 in the locations where I would be decaling.

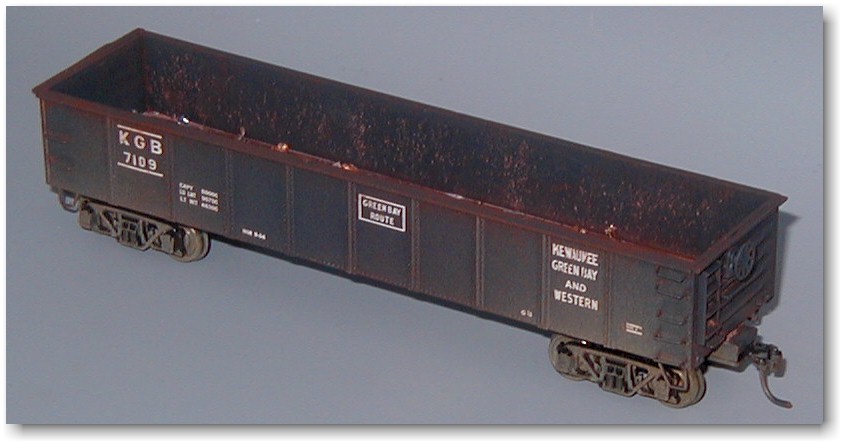
The car had the standard GB&W lettering used in the 1950s and 1960s, so I was able to use a Scale Rail Graphics GBW/KGB 40' wood boxcar decal set to letter the car. These decals are very thin and I had troubles with the large KEWAUNEE GREEN BAY AND WESTERN decal; it took several attempts to get one of those decals down without tearing. By the end of the second side of the car I developed the technique of putting the dry decals down on the car side and then using a wet Q-Tip to release the backing paper. (Andy gave me some decal tips after that so I hope things go better with future projects.)

The car number was cut from the boxcar number set, using the middle digits of an "8100" from the set and then adding a "7" to the left and an appropriate finishing number, remembering that the KGB cars were odd numbers only.

Andy and I used two photos to determine the positioning of the lettering. Interestingly enough, the cars were lettered differently! KGB 7177 had the CAPY data below the road number in the second panel, while 7195 had that data on the third panel. Andy and I both chose to model our cars after the 7195 style, as that was the later photo and matched the other open-topped cars better.

I used the largest dimensional data in the Scale Rail Graphics set for the car; again, this was a "close enough" decision. A Microscale or similar set could be used to get more exact data but considering the accuracy of the basic car body and the scale I had no problem with using the SRG data.

My favorite use of the SRG set was to cut out letters from some end reporting marks to add a GB AAR code to each side of the car. The CALDWELL SNUBBER lettering from the decal set was used as a filler in the far right panel of each side and a NOR 9-54 shop date completed the "close enough" lettering. Two applications of Microscale Micro-Sol set the decals in place.


The model under construction
Larger Image

Quick links:

Badger Air-Brush Co.
   ModelFlex Paint

Scale Rail Graphics
   Green Bay & Western Decals

Microscale Industries
   Freight Car - Gothic Lettering - Black & White

Trucks & Weathering

The prototype had Andrews trucks so I added a pair of Accurail  Andrews Trucks, sans wheels. Kadee #58 couplers were added and the project was ready for weathering.

I used A.I.M. products Real Rust to weather the outside of the car. I dribbled some rubbing alcohol on the inside of the car and sprinkled some A.I.M. rust powder with a toothbrush on the inside walls of the car. Modelflex Mud #16-73 was sprayed on the trucks and adjacent car body and some Modelflex #16-09 Reefer Orange was sprayed on the coupler head and over the lettering to simulate a light coating of fresh rust.

Finally the car was sprayed with Testors Dullcote from a can and I sprinkled a few metal scraps painted brown and black on the floor of the car while the Dullcote was wet to simulate scraps from a prior shipment.

The trucks were fitted with Intermountain 33" metal wheel sets that were weathered separately and had the treads polished with my motor tool.

The car is ready to go into service on my 1960s-era Green Bay & Waupaca Railroad!

Accurail Inc.
   Andrews trucks

Kadee Quality Products
   #58 couplers

Badger Air-Brush Co.
   ModelFlex Paint

The Testor Corp.
   Dullcote

InterMountain Railway Co.
   HO Accessories


Parts List

Detail Manufacturer Walthers
Catalog No.
Description
Basic model body Model Die Casting 480-1340 40' steel gondola - flat ends
Grab irons Tichy Train Group 293-3021 18" straight grab irons
Stirrup steps  A-Line 116-29001 Stirrup step style-B
Paint Badger 165-1605  Modelflex paint - weathered black
Decals Scale Rail Graphics 31051 GBW/KGB 40' wood boxcar decal
Microscale 460-105 Micro-Sol
Trucks Accurail 112-103 Andrews truck
Wheels Intermountain 85-40050 33" wheels
Couplers Kadee 380-58 Scale Coupler
Weathering: AIM Products   Real Rust
AIM Products   Rust Powder
Badger 165-1673 Modelflex paint - mud
Badger 165-1609 Modelflex paint - reefer orange
Testors 704-1260 Dullcote 
 

[ Top of This Page


 The Green Bay Route is maintained by Mark Mathu.
Visit the Guest Book or send comments to mark@mathu.com.
Updated July 11, 2015